March 12, 2012

Why I NEED an Inspiration Board - Pt. 1

     Planning your wedding! Some brides find this torturous, while others are more then willing to play the part of the wedding consultant. Details make up a great deal in accomplishing your vision, so allow me to explain to you one of the most important tools towards making your dream a reality.

An INSPIRATION BOARD is the one of the greatest inventions of the modern wedding; because of these four reasons:

WHY I NEED AN INSPIRATION BOARD:

1. It Helps Everyone Stay on the Same Page.
(the cake designer, the choice of gown, the colors, the bridesmaids in choosing their dresses, the little details, the coordinator, the florist, etc.)

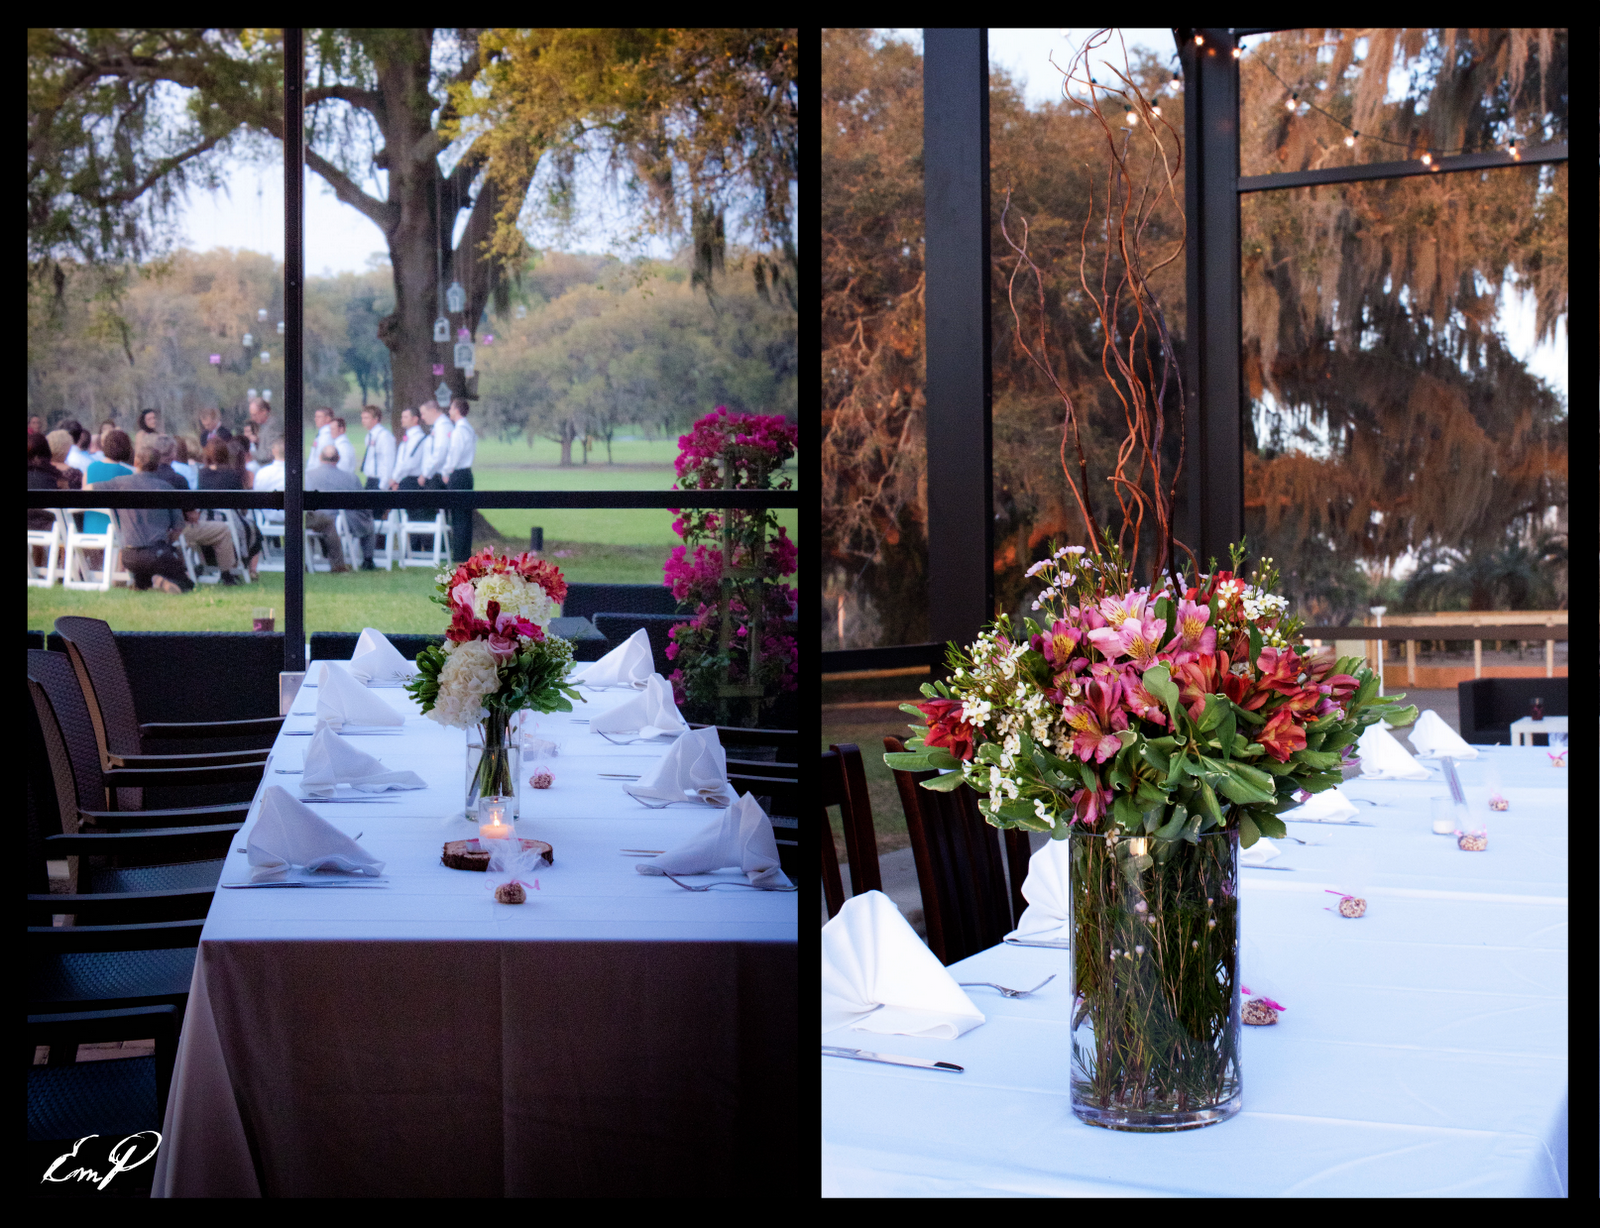
In design, communication is key! You can tell someone your wedding is "modern" and "red." While you're thinking ruby red with chevron print, your designers might have a completely different idea of modern and red. There are several different shades of red, from poppy to burgundy; because brides have invented every shade under the rainbow. So, if anything, keep your inspiration board on hand to help everyone understand what you're communicating. I even recommend sending it to your caterer!

2. It Saves Time.
Rather then having a cake designer try three different ways to figure out your ideas, why not show them an image? A pictures says a thousand words; I have found many people find it easier to learn visually then vocally. Don't frustrate yourself and vendors by not all communicating on the same page. Or worse - finding your actual wedding details an unmatched nightmare!

3. It Helps Keep Your Details in Order
Like I have said before, weddings have always been about little details coming together to create a beautiful collaboration. Think of weddings in the past. Do you think brides have always worn white? Do you believe a wedding cake has always been a tradition? Brides have started these traditions, because they added their OWN details.
If you and another bride both had the same inspiration board, your weddings would still come together uniquely different; because everyone finds those little details that add-up to THEIR event. The inspiration board is simply a guideline to help keep you on that track. If you wish to illuminate everyone with your details, then I definitely encourage you use an inspiration board to illustrate your dream wedding. Keep it close at hand - always!

4. It Keeps You on Track!
When decorating, it's so easy to come up with an idea and end with something completely opposite in the end. David Tutera's show is a great example of this, because he finds brides who had a style in mind (asain themed, country, girly, gothic, etc) and they sit baffled looking at a mess of items that might relate, but definitely do NOT match.

Items from Bride for a 1920's wedding, featured on "My Fair Wedding" with David Tutera


 Rebel Romantic
Inspiration Board No. 9

The details I have laid out in this inspiration board are: 

  • Chevron print
  • Lace
  • Adele's Makeup
  • The Color Scheme
  • The Spike Heels
  All of which are very much in-style for this fall.
Thank you for visiting 
The Glass Slipper!


March 10, 2012

Erica & Chase, March 3, 2012

 The night was set in candlelight and market lights to create a country twilight ambiance. Touches of birdcages were put throughout the ceremony and reception, to symbolize lovebirds. A windy, but cool evening; dusk began to set to create the perfect romantic evening for Erica and Chase's vows.


Moss blew in the wind as the wedding party flowed down the aisle.

The bridesmaids wore different colors of fuchsia pinks, each looking beautiful in their own shade and style.


Sunken rosebuds, drew the way for our bride down the aisle.


Family was very important to our bride and groom, so we added pictures of family members and their years growing up, throughout the reception. 


The brides bouquet. This is actually my own design and creation. I added a bird charm to the side of the bouquet to add that small charming detail.

 
Nicole Ferguson did Erica's make-up and hair - and she did a beautiful job! Erica's eyes were smokey gray, which made her green eyes glow.


Such a fun night! Watch as the bride gets her moves on.

Such a beautiful couple! I would like to Thank Erica and Chase for the opportunity to plan my first wedding from start to finish. Much to my delight, I had so much fun being the event planner and adding the special touches. I would also like to thank Tammy, Jordyn, Danielle, and everyone one else who contributed to making this wedding a success! I couldn't have done it without their support and teamwork.
Erica was such a wonderful bride to work with and I know this couple will have many happy years to come. Congratulations to the groom and best wishes to our bride!

Mark 10:9
"What therefore God hath joined together, let not man put asunder."
 

March 08, 2012

Makeup Brush Care


Its easy to say, most people don't take care of their makeup brushes. You don't have to be an artist or even someone who uses them everyday to have to know how to properly care for them!
For example... Have you ever had a random pimple on your face, in a place you would not normally have a break-out? It's very possible that you need to clean your brushes. 

When you don't clean your brushes, bacteria builds up and as a result you are constantly moving bacteria around on your face, daily! Cleaning your brushes is something that takes about 5 min. extra a day, and an extra 10 minutes (Max) every 2-3 weeks.


First thing, I highly recommend using a daily ANTIBACTERIAL brush cleaner. Disinfecting and protecting your brushes actually prolongs your brush life! I would recommend this brush cleaner from Sephora. The travel size is 2 oz. and is only 6$ or a 6.75 oz is 14$ and would last you at least 6 months if not a year. 

To Use: Spray cleaner onto a tissue, or directly onto the brush about 3 sprays to make sure the bristles are saturated. After that, just rub off onto the tissue and you will see the makeup coming off. Repeat until there is no makeup showing up on the tissue. 

When this is done daily, the task of keeping your brushes clean is much faster and easier.

Second thing, is just as important as the first. Deep Cleaning.  This is to be done preferably once a week, but at least once every two weeks. Think of it as a detox for your brushes. You are ridding them of anything you can and cannot see that is harmful for your face. I would recommend this Brush Shampoo from Sephora. Prices and Sizes are the same as the daily cleaner. 


To use: Pump shampoo 1-2 times into the palm of your hand. Take your brush and saturate it with water. Take the brush and swirl it around in your hand and watch as the makeup melts right off your brush (That is the best part!). Rinse brush under warm water, making sure ALL of the shampoo is out. If not, it will leave a sort of residue feel to the brush. Repeat until the water runs clear when rinsed out. 
While doing this process it is very important to use gentle swirling motions, and to try to keep the form of the brush in tact. You don't want to damage your brush shape, and some brush hair is more gentle than others. 
When you are done shampooing your brush lay it on a towel or tissue to dry for several hours, letting all of the water evaporate out.

Those are the two brush cleaning basics. If you are in a hurry on a certain day and do have time to do even the spray cleaner, then try using makeup brush wipes, also available at Sephora for $3-9.Wipes like WetOnes could also work. Sephora also just came out with slide-on brush protectors to safely store your brushes, and protect their shape right after cleaning them ($8). 

Tips on what NOT to do..
-Do NOT try to blow dry your brushes so you can use them after. Doing so, could cause heat damage to the hair, and also make them to fluffy to use.
-#1 Mistake in the Do NOT do category is using hair shampoo or conditioner to clean brushes. BIG no no. Hair shampoos have other additives in them that can cause your bush hairs to possibly break, but also frizz, and become course. If you are in a serious pinch, use a baby shampoo that is very gentle.
-With certain animal hair brushes (such as Bare Minerals brushes) you need to find conditioning brush cleaners or use baby conditioners added to the shampoo to keep them from drying out and becoming course.

I believe I have covered everything on brush care basics. If you have any questions feel free to leave a comment, and I will try to answer it for you! In doing these steps, I know your face will thank me. Your makeup will go on better, your skin will be clearer, and your brushes will last longer! 


March 01, 2012

Announcing our WINNER!


We would like to announce our winner, LEAH, who will be recieving the prize of a
Mini*mergency Survival Kit!
Thank you to all our participants - we look forward to doing move giveaways in the near future.
Thank you to all our fans and supporters!

.


February 29, 2012

FACE JUNKY - DIY BRIDES NEED A MAKEOVER TOO

 Eileen, "Oooh La La! We are so excited to tell ya'll about our fabulous time at FACE JUNKY in downtown Perrysburg, OH! Jenelle and I were pampered with champagne and makeovers, prepping for our night watching the Oscars. I must say, I definitely felt like a star!"

If you're a bride, it's easy to let makeup take the back-seat in your wedding budget; especially all our fabulous DIY brides. Maybe you think you can save other ways or makeup just isn't on the priority-list. Girls, we all want to look beautiful - it's your wedding day and the one day you SHOULD look like diva! So indulge a little bit! You can still be natural and stunning!

Something that brides may not know about either, is that the quality of your makeup shows in your pictures. Cheaper products are not going to have the pigmentation or color contrast that you need to show-off your natural beauty. There's a reason all actors wear make-up for the camera. It's important that on your wedding day you use a good quality makeup brand (and I'm not talking CoverGirl) to show off your amazing features, like making your eyes POP or showing off those perfect cheekbones! I'll let our pro, Jenelle take it from here. ;)

Jenelle, We had a blast with our time at Face Junky. From being with friendly upbeat workers, to staring at all of the unique products and makeup. They have so many great ideas for gifts too! I even bought my pups some "Pooch-Pouri" and I absolutely love it! 
I love the idea of supporting local businesses, and this cute little boutique is the first of its kind around here. If you live in this area, and haven't been there, you gotta go!

But like Eileen said, makeup is a must for your wedding. As a bride I would highly recommend a full run-through with your artist before hand just like you would for your hair. #1 Because you want to make sure the you and your artist are on the same page, and #2 well.. just get some more pampering in before your big day! 

Let's take a look at what we did while we were at Face Junky!

Meet Dara! Dara was such a beautiful and bubbly hostess! She made us feel welcome right away at FACE JUNKY, by offering us champagne and getting our makeovers started!

Carl Was QUITE the professional! He had the most upbeat and suave personality!


Before and After shots! I LOVED my makeover! Carl gave me subtle smokey eyes, with a trail of bold bronze glitter liner above my eyelids. He added a bronzer along my cheekbones and finished off the look with a vampire berry lipstick; I felt HOT!

Yes, there might be something wrong with this picture. 
This is Jenelle WITHOUT makeup. Stunning!

Dara spent a lot of time perfecting the look of a bold dark smokey eye. She used the "Diva Eyes" Palette from Eve Pearl with a Julie Hewett "Gia" Eyeliner. She used a natural Rose Cream blush, so that it would stay on all night. For my lips, we decided to go with a nude lip, so not to over power my dark eye look. For this we cocktailed two colors together to get the exact look we wanted. We mixed Julie Hewett "Sophia" and "Tish".  I Loved seeing Dara's technique and didn't want to take my makeup off that night! 


There is a reason women love having a man do their makeup. Carl is quite the professional and I must say with 15 years experience! I was taken aback at his knowledge and definitely felt assured, because I was in good hands for a professional makeover!


Brides, if we could recommend one product, we suggest 
They are the same company that makes the "Mini-Mergency Kit" We have in our giveaway!


 I went for a dramatic look and tried dark lipstick for the first time, Jenelle went with a Sultry Smokey look; both of us left feeling pumped and gorgeous!

 We would love to THANK Debbie, the owner of FACE JUNKY, and all the artists for having us - we look forward to visiting in the future!


February 26, 2012

How-To Make a Burlap Aisle Runner

Don't! Just kidding. Although, making this aisle runner turned into quite a headache and I almost gave up on her a few times; but if you love the idea and need some advice, please read on.


Completely inspired by my cousin's wedding,  I thought, "Oh my goodness, how adorable would this look along with her rustic charm wedding theme?!" Little did I know, that a few days later I'd be tangled in 7 yards of burlap and speaking in strange tongues, yelling at myself, "NEVER EVER AGAIN!" Continue to read though, if you're as determined as I was.


You will Need:
  • 7 yards of burlap (or however long your aisle is)
  • 7 yards of white fabric
  • A good quality Sewing Thread (tan)
  • Wilson Iron-on Paper
  • A Sewing Machine
  • Fabric Paint
    • Pins
    • A Seam Ripper (just in case)
  • A Thin Paint Brush 
  • Buttons
  • A Glue Gun
1. Iron on your Monogram. Use Wilson's iron-on for light fabric. You can find this at Michael's Crafts. Make sure to mirror your image and that your letters are straight. Use a pillow case to iron for the first 25 seconds, then iron-on the paper for another 15-20 seconds without the pillowcase. Remove the iron-on while the paper is still hot.


Tip: You can find elegant fonts for free on www.dafont.com. This font is called, 
"Indenture English Penman."
The Difference: Left, is paint - Right, the iron-on.
2. Use a very thin tip paint brush and mix your colors. Paint to fill-in your monogram. It may take two-three coats before you're happy with your final product.


3. Glue-gun your buttons. I printed out my ampersand symbol onto a piece of paper and then I placed the paper under my burlap - using it to trace my ampersand. I then glue gunned the buttons one-by-one.


 This is what my final monogram and ampersand looks like.


4. Make SURE to sew the aisle runner INSIDE OUT. After flattening and making sure there were no bubbles or wrinkles, I literally used 100 pins to make sure my fabric didn't shift while sewing... after I murdered my seam ripper. :)


5. MAKE SURE you leave a gap at the end to turn your runner back inside out once you're finished. To end the tedious task of a burlap aisle runner,  tuck the seams at the end and sew them in a straight line.


6. I added the date, using steps 1 and 2. 
7. Iron your runner to smooth out any wrinkles. Be careful not to iron your paint.

I must say, I feel pretty proud of my hard-efforts and it all paid off, because my bride is thrilled. This is a one-of-a-kind piece, I couldn't find very much inspiration online for a burlap aisle runner. Probably because the wiser bride would never undertake taming 7 yards of burlap. 
I look forward to publishing the professional pictures later from my cousin's wedding. 
Thank you reading!